


Nail Wraps With or Without a UV Lamp: The Ultimate Guide for Perfect Nails

Inhaltsverzeichnis
Nail Wraps with or Without a UV Lamp: The Ultimate Guide to Perfect Nails
Welcome to my post! As a pharmaceutical expert, the health of your nails is also important to me. That's why today, in this "Nail Wrap 101," we'll be discussing nail art and nail care. A topic that is becoming increasingly popular in the beauty world: nail wraps. The question of whether to use nail wraps with or without a UV lamp is particularly exciting. In this post, you'll learn everything you need to know to choose the best nail wraps for your needs and to professionally beautify your nails. Let's dive into the world of nail art together!
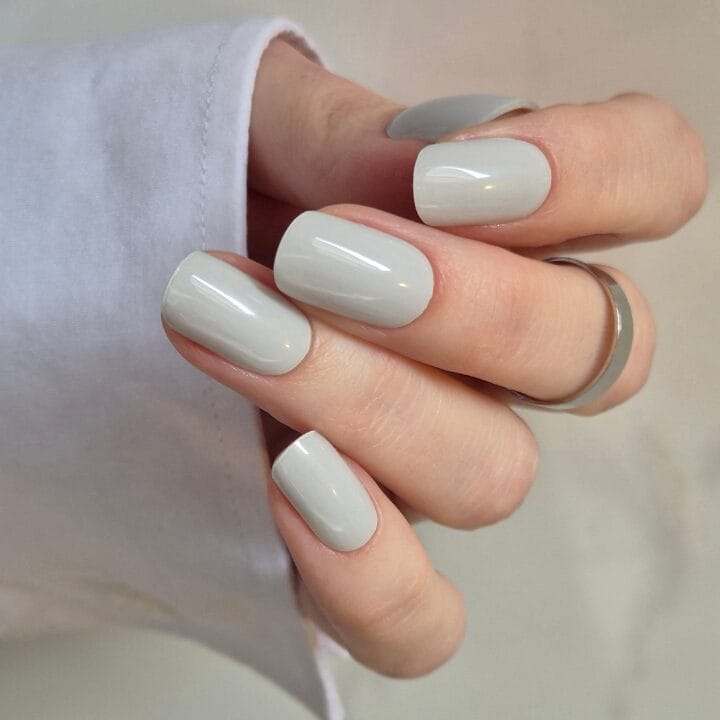
1. What are Nail Wraps? Basics and Benefits Nail Wraps – the trendy alternative to gel and acrylic nails
Nail wraps – the trendy alternative to gel and acrylic nails
Nail wraps are thin, self-adhesive, partly pre-cured polishes that are applied directly to the natural nail. Depending on the manufacturer, the foils have full-surface or punctiform adhesive areas on the underside. Here it makes sense to take a closer look. Can €3 strips be provided with high-quality, anti-allergenic substances? Simply put, they are a quick, easy, and inexpensive way to transform your nails into stunning works of art. Whether subtle patterns, striking designs, or elegant color gradients – TREND 2025 is definitely all about summer blue tones and leopard looks, so nail wraps offer a huge variety of motifs and styles, allowing everyone to easily get creative at home.
Advantages of Nail Wraps
Easy application: No professional nail salon necessary, perfect for beginners.
Quick results: You can beautify your nails in just 10-20 minutes.
Note: regular nail wraps are like large nail stickers and are not stretchable
As an overlay on one or two fingers, an absolute game changer for DIY individual nails
Lasts 3-10 days depending on manufacturer and quality
Variety of designs: From classic patterns to modern trend designs.
Cost savings: Significantly cheaper compared to gel or acrylic nails.
No UV light required: for regular nail wraps, just note that wear time and quality may suffer. For "regular nail wraps" use a high-quality base coat and a top coat for fixing.
(by regular, I mean they are not gel wraps) There are already some that are suitable for kids as young as 2 years old.
Why nail wraps are so popular
In today's fast-paced world, many are looking for uncomplicated solutions for beautiful nails. Nail wraps are the perfect answer because they deliver impressive results without much effort. They are also ideal for anyone who is sensitive to UV light or doesn't have the equipment at home.
Nail wraps with UV lamp: For long-lasting and professional results Why a UV lamp for nail design?
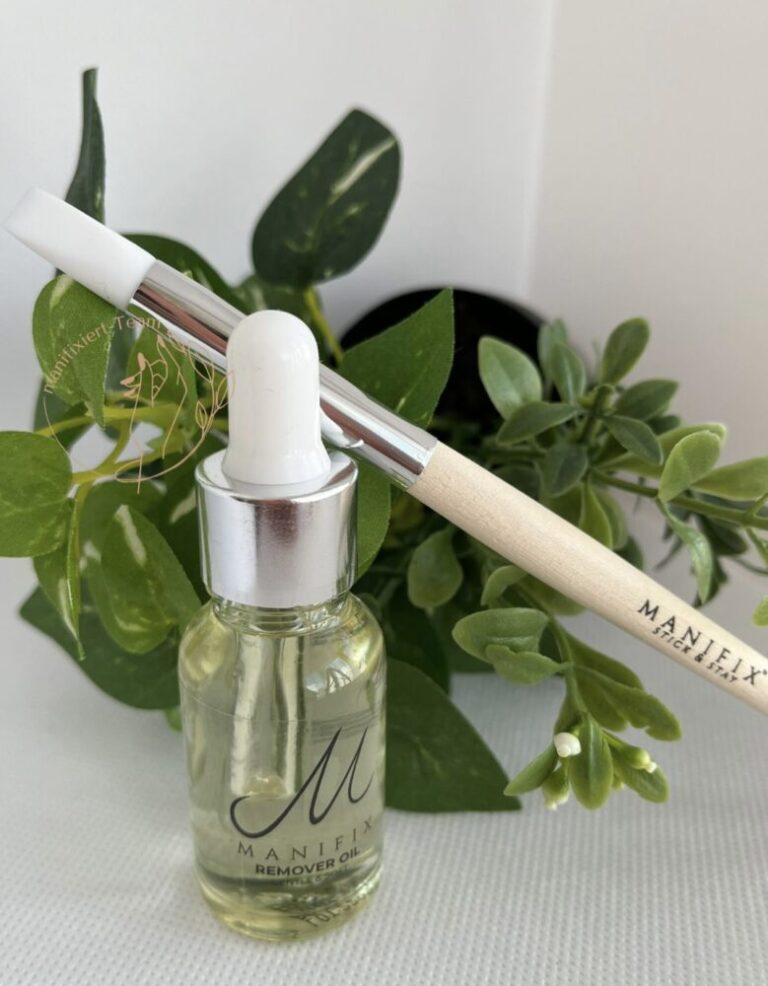
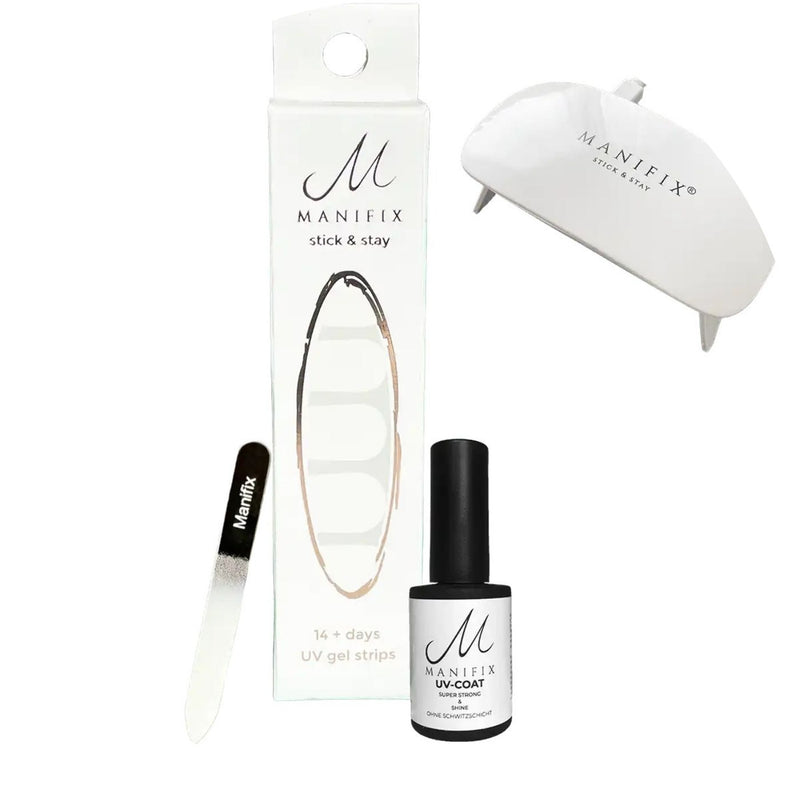
Why a UV lamp for nail design? For some nail wraps, especially those designed for longer durability, curing under UV light is necessary. This technique is often used for gel nail wraps or special design foils to improve adhesion and extend their lifespan. Advantages of nail wraps with UV lamp Longer durability: Up to 2 weeks or more, if applied correctly and it's an original Manifix product. Higher stability: The design remains beautiful even with daily wear and tear. Professional finish: Curing under UV light ensures a smooth, shiny result. Studio quality, but significantly gentler on your nails and nail bed. More flexibility in designs: Complex patterns and 3D effects can be fixed better. Tip: Use nail stickers, available for under €3. For example, with discount codes from Manifix Passionista – enter "happysimi" in the shopping cart and receive -15% off everything at Manifix. (excluding starter sets)

Discount code
With the code
happysimi
you save on all nail wraps and UV nail wraps in the shop.*
shop now
Application tips for nail wraps with UV lamp
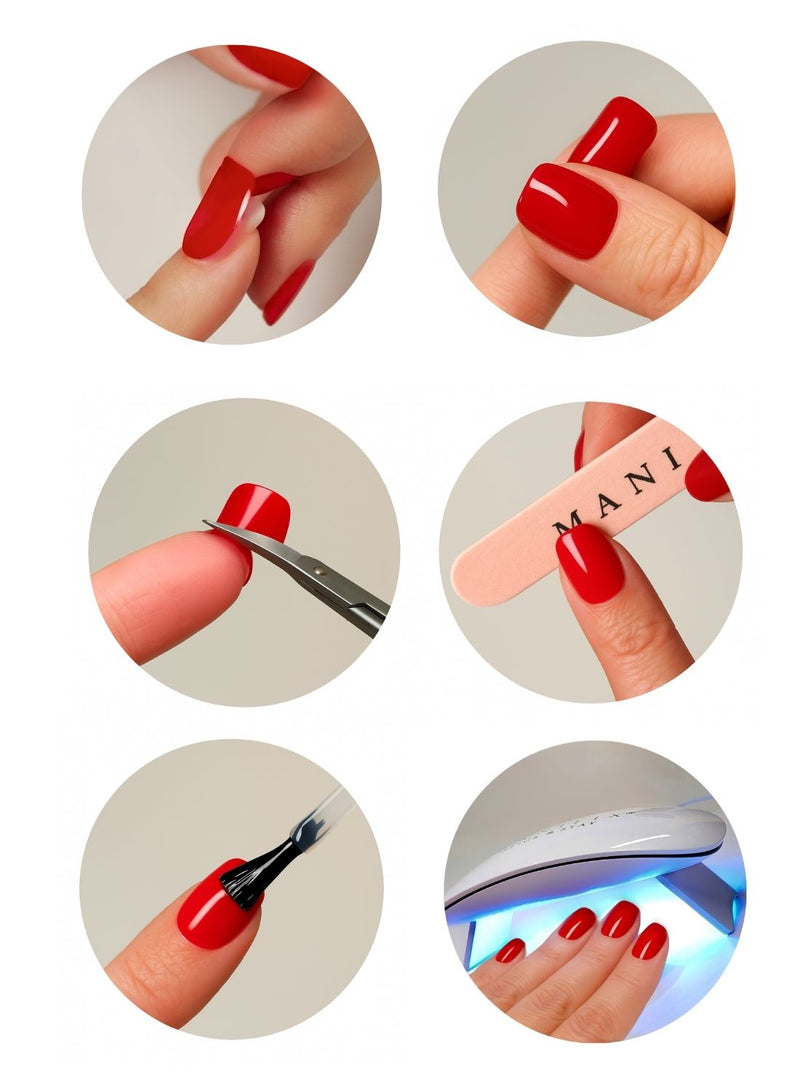
Preparation: Clean, degrease and, if necessary, apply a base coat to your nails (only for normal nail foils). Are your nails a bit uneven or ridged? Then gently use a suitable buffer and slightly roughen the transitions of the ridges. Don't forget to remove the excess abrasions.
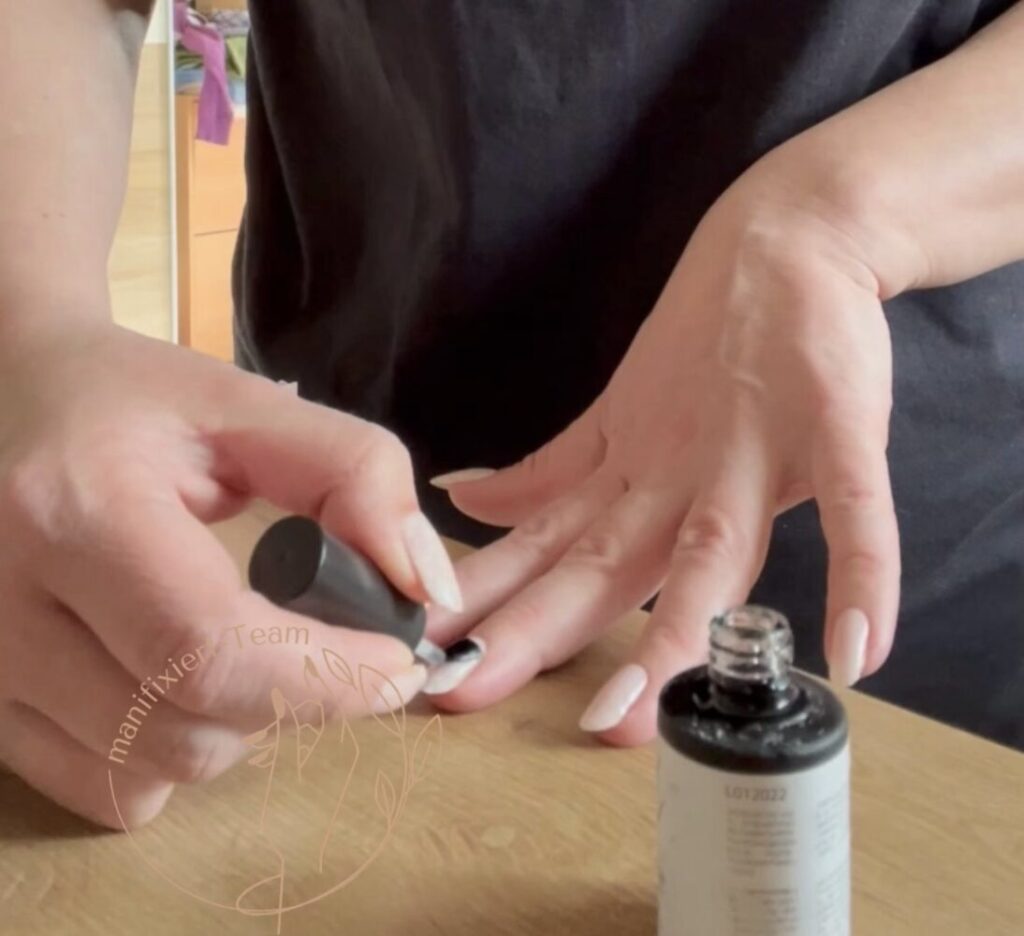
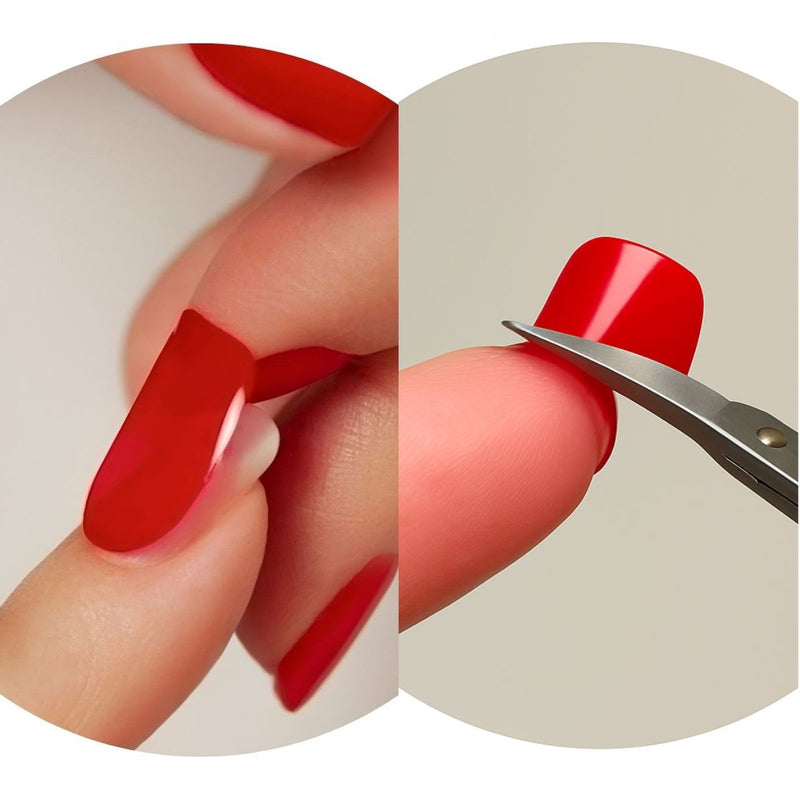
2. Application: Carefully stick the nail foil onto the nail and smooth it out. Start in the middle and pull to the right and left. (Only works with high-quality UV gel nail foils!) Otherwise, place the foil at the edge and gradually glue it to the other side of the nail edge. Use aids such as silicone hoof sticks or rosewood sticks. No fingers (The skin naturally has oil content, and foils don't like that.)
Curing: Cure the nail foil with a UV lamp (max. 6 watts for Manifix or higher for other manufacturers) for approx. 60 seconds. In my experience, curing twice for 60 seconds in winter achieves a better and longer-lasting result. The exact time depends on the product, of course – always follow the manufacturer's instructions!
Sealing: For extra protection, you can apply a transparent top coat layer (normal nail wraps) without a UV lamp. Better for sealing and maximizing durability is a UV polish (colloquially often incorrectly referred to as top coat)
Tip: For a particularly professional result, you can use a thin layer of UV polish to enhance the shine and increase durability. But also MATT or with glitter as well as HOLO, entirely to your taste. You can also change your nails from glossy to matte after one week. Did you know that? To do this, simply brush on a thin layer of UV polish matte after one week and cure under UV for 60 seconds.
Manifix: Your partner for high-quality nail wraps and nail care products. To conclude, I'd like to introduce you to a great brand that specializes in high-quality nail wraps and nail care: Manifix. As an expert, customer, Passionista, and PTA by profession, I can say that Manifix is known for its innovative designs, long-lasting products, and easy application. Whether you choose nail wraps with UV curing or the quick variant without a UV lamp – Manifix offers a wide range of patterns, colors, and textures that will make your nails shine. I'm going to red-flag the 15-minute time estimate here for honesty's sake! Because beginners can certainly take 30 to 60 minutes. After all, natural nails also need to be cared for, degreased, and possibly trimmed or shaped. Therefore, the motto is: give the foils a chance, take your time, and use it as "Me Time". You'll see, after 2-3 times, you'll be a DIY nail art pro ;-) CONCLUSION: So, if you're looking for high-quality nail wraps that are easy to apply and deliver impressive results, Manifix is definitely a brand you should consider. I hope this guide has helped you make the right decision and take your nail art to the next level. Have fun trying it out and beautifying your nails! If you have any further questions or need tips, I'm happy to help! On Insta: @simi_pta or @manifixiert. Don't be shy, there are no uncomfortable questions. Yours, Simi
UV Nail Wraps by MANIFIX
Nail Wraps 101
In MANIFIX Nail Wraps 101, you'll find all sorts of tips & tricks for applying our nail wraps, as well as exciting articles on special topics like Baby Boomer nails. With our Nail Wraps 101, hopefully, no questions will remain unanswered, helping you achieve the perfect manicure.
all news at a glance
*excluding starter sets.
» CODE: happysimi sparen
» CODE: happysimi sparen
» CODE: happysimi sparen
Innovative Nagel-Trends & UV-Nagelfolien: Simone Metzler
Kostenfreie Beratung von Simone Metzler
Simone Metzler
Simone Metzler
Simone Metzler

EXCLUSIVE. ALWAYS INFORMED.
Newsletter
Become a MANIFIX Insider - and never miss another offer.